

Hey there! So, you’re curious about AWS Route 53, huh? Well, you’re in luck because I’m about to give you the ultimate guide to mastering this powerful DNS service. Whether you’re a total newbie or need a refresher, I’ll walk you step by step through everything—from what DNS is to how to register a domain to setting up fancy stuff like GeoDNS. Trust me, you’ll be a Route 53 pro by the time we’re done. Let’s get started!
Tip 💡: New to AWS? Consider our AWS Learning Roadmap as your starter guide!
What is DNS? (And Why Should You Care?)
DNS stands for Domain Name System, and it’s like the phonebook of the internet. You see, every website has an IP address, which is a bunch of numbers, like “192.0.2.1”. But who wants to remember that? That’s where DNS comes in—it translates human-friendly names like “www.example.com” into those IP addresses so you can access websites easily. Without DNS, we’d all be lost in a sea of numbers!
DNS is crucial because it makes the internet user-friendly. Imagine trying to visit your favourite sites by typing in long strings of numbers—yikes! DNS also plays a big role in directing traffic, ensuring that your requests go to the right servers. Plus, with features like GeoDNS (we will explore this below as well), you can even route users based on their location for faster load times and better experiences.
What is AWS Route 53?
So, what is AWS Route 53? It’s Amazon’s scalable and highly available DNS web service. It’s designed to give developers and businesses an extremely reliable and cost-effective way to route end users to Internet applications. Route 53 can also be used to purchase and manage domain names, which is super convenient if you already use AWS for other services.
Here are some of the key features of AWS Route 53:
- Domain Registration: Buy and manage domain names directly through AWS.
- DNS Management: Create and manage DNS records with ease.
- Health Checks: Monitor the health of your resources and route traffic accordingly.
- Failover Routing: Automatically redirect traffic if a resource becomes unavailable.
- GeoDNS: Route users based on their geographic location for optimized performance.
- Integration: Seamlessly works with other AWS services like S3, CloudFront, and ELB.
Getting Started with AWS Route 53
First things first, you need an AWS account. If you don’t have one yet, head over to aws.amazon.com and sign up. It’s free to get started, and you only pay for what you use. (Also, consider learning about AWS Free Usage Tier while signing up as well)
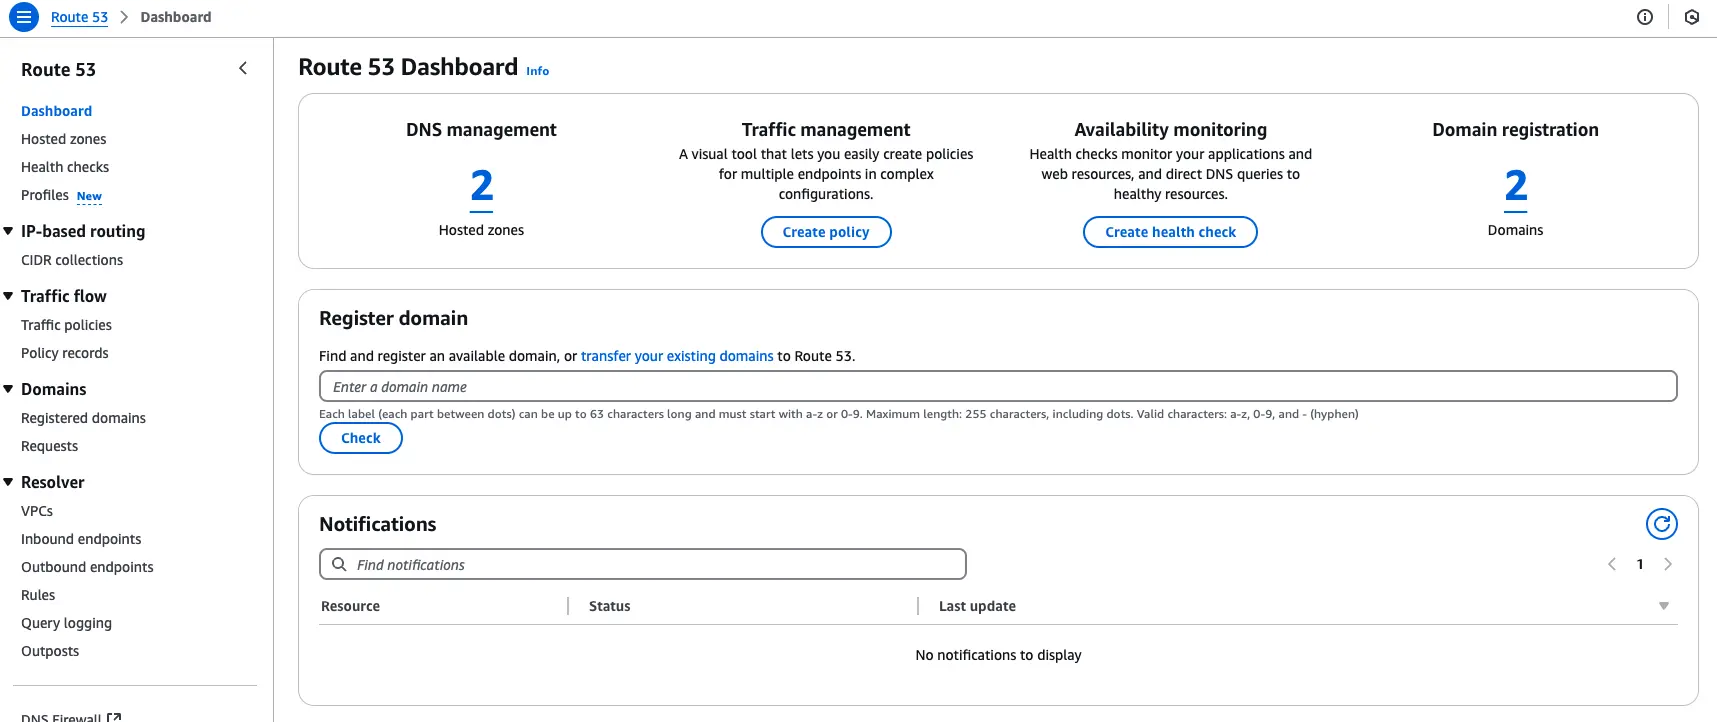
Once you’re logged in, go to the AWS Management Console. From there, you can find Route 53 under the “Networking & Content Delivery” section. Click on it, and you’ll be taken to the Route 53 dashboard.
How Do I Register a Domain with Route 53?
Let’s say you want to register a new domain. In the Route 53 dashboard, click on “Registered domains” and then “Register Domain.” You’ll be prompted to choose a domain name. Type in your desired name and see if it’s available. If it is, great! Follow the steps to provide your contact information and payment details. Once that’s done, your domain will be registered, and you can start managing it through Route 53.
If you already have a domain with another registrar, you can transfer it to Route 53. The process involves unlocking your domain, getting an authorization code from your current registrar, and then initiating the transfer on Route 53. It might take a few days, but once it’s done, you’ll have all your domain management in one place.
DNS Management with Route 53
To manage DNS for your domain, you need to create a hosted zone in Route 53. A hosted zone is like a container for your DNS records. To create one, go to “Hosted zones” in the dashboard and click “Create Hosted Zone.” Enter your domain name, and Route 53 will generate the necessary records, including NS (Name Server) and SOA (Start of Authority) records.
Understanding DNS Record Types
There are several types of DNS records you can create:
- A Record: Maps a domain to an IP address.
- CNAME Record: Maps a domain to another domain name.
- MX Record: Specifies mail servers for the domain.
- TXT Record: Holds text information, often used for verification.
- And many more!
For example, you’d create an A record with your domain name and the server’s IP address to point your domain to a web server.
How to Create a DNS Record
Let’s create an A record. In your hosted zone, click “Create Record.” Choose “A – IPv4 address” as the record type. Enter the name (e.g., www), and in the value field, put the IP address of your web server. You can also set the TTL (Time to Live), which determines how long the record is cached. Click “Create,” and you’re done!
💡 Pro Tip: The changes take some time to reflect. So, don’t sweat it if DNS records aren’t propagated immediately. You can also use tools like whatsmydns.net to check for DNS propagation status.
Health Checks and Failover Routing
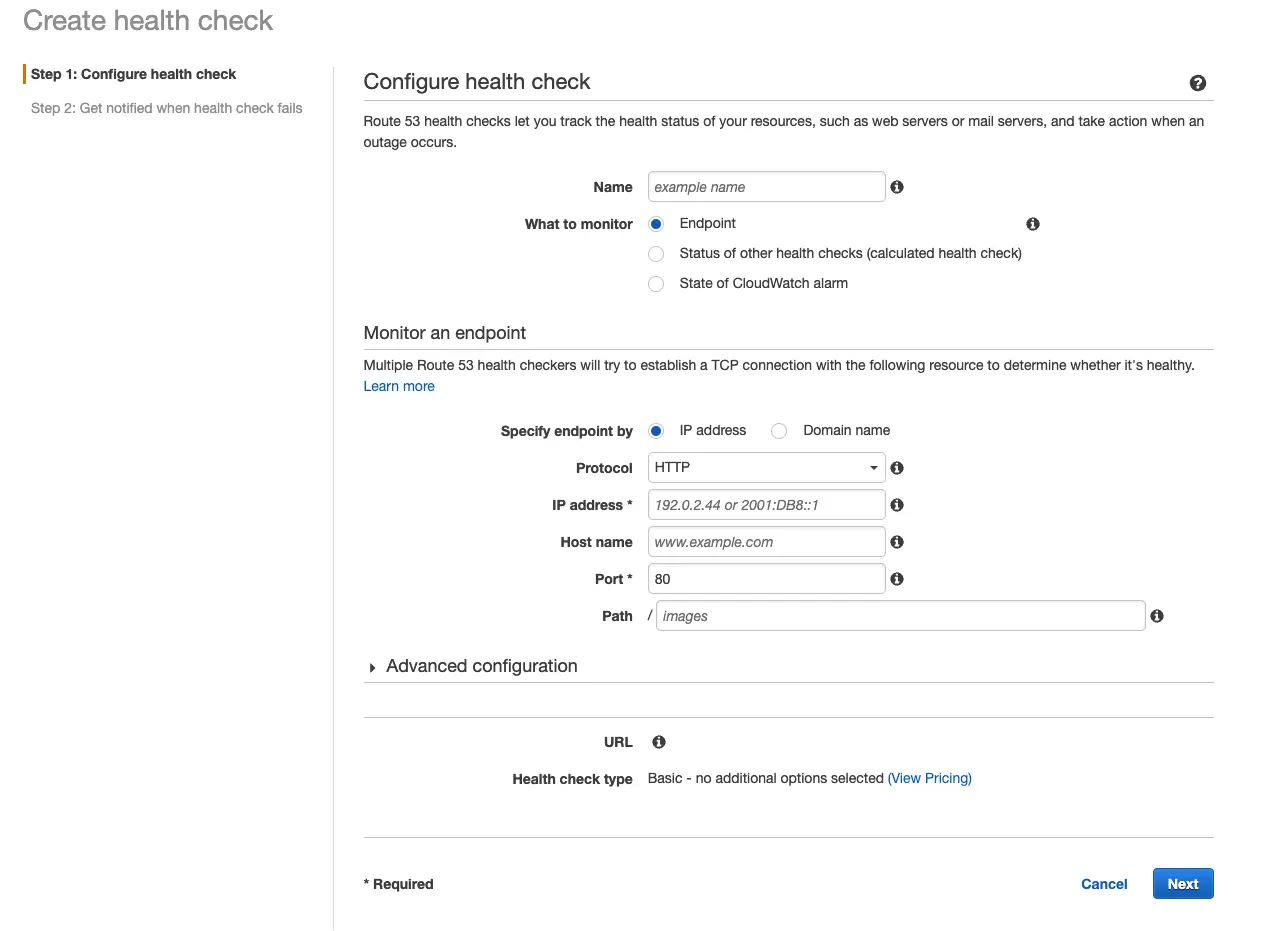
Route 53 can monitor the health of your resources and route traffic only to healthy ones. Health checks can be set up to monitor your resources. To do this, click “Health checks” in the dashboard and click “Create health check.” You can specify the endpoint to monitor, the protocol, and other settings. You can associate the health check with your DNS records once the health check is created.
For failover routing, you must create two records: a primary and a secondary—the primary record points to your main resource, and the secondary to a backup. Associate health checks with these records, and Route 53 will automatically switch to the secondary if the primary fails.
Introduction to GeoDNS
So, what exactly is GeoDNS? Well, it’s a way to route your website’s traffic based on where your users are located. Imagine you have servers in different parts of the world—like one in the US, one in Europe, and maybe one in Asia. With GeoDNS, you can make sure that users from Europe get directed to the European server, users from Asia to the Asian server, and so on. This means faster load times because the data doesn’t have to travel as far. Plus, you can even serve different content based on location if you want—like showing prices in local currency or complying with regional laws.
Benefits of GeoDNS
The benefits are pretty awesome, for example:
- Speed: Users connect to closer servers, so everything loads quicker.
- Compliance: If there are laws about where data can be stored or processed, GeoDNS helps you comply with them.
- Customization: Tailor your content to different regions without needing separate domains.
It’s like having a personal tour guide for each user, directing them to the best experience possible.
How to Set Up GeoDNS in Route 53
Setting up GeoDNS in Route 53 is straightforward. Here’s how you do it:
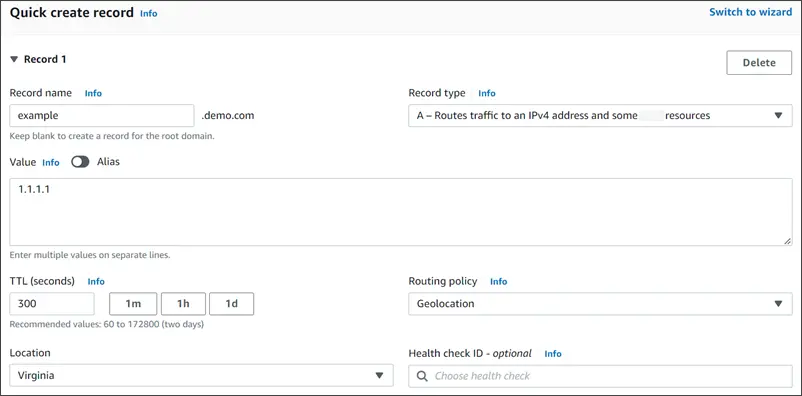
- Create Your Records: In your hosted zone, go to “Create Record.”
- Choose Geolocation Routing: When selecting the routing policy, pick “Geolocation.”
- Specify the Location: You can choose a continent, country, or even a specific state in the US. For example, select “Europe” for users in Europe.
- Set the Endpoint: Enter the IP address or choose another record that points to your European server.
- Repeat for Other Locations: Do the same for other regions you want to target.
- Add a Default Record: Create a default record for users whose location doesn’t match any of your specified regions. This way, everyone gets routed somewhere.
Once you’ve set this up, Route 53 will automatically direct users based on their location. It’s that simple!
Advanced Topics
Route 53 offers advanced routing options through traffic policies, where you can visually design complex routing scenarios. Additionally, Route 53 integrates seamlessly with other AWS services. For instance, you can use Alias records to point to S3 buckets, CloudFront distributions, or Elastic Load Balancers without exposing the underlying URLs. See official documentation for more details.
Best Practices and Tips
Here are some best practices to keep in mind:
- Security: Use Route 53’s DNSSEC feature to secure your DNS data.
- Cost Management: Be aware of the pricing for queries and hosted zones. Route 53 is cost-effective, but monitoring your usage is always wise.
- Performance: For optimal performance, use latency-based routing or GeoDNS. Trust me, your users will thank you for the speedy experience!
Common Mistakes and Troubleshooting Tips
I remember when I first started with Route 53, I was a bit overwhelmed. But trust me, it’s easier than it looks. Here are some common mistakes to avoid:
- Forgetting the Default Record in GeoDNS: Always include a fallback for locations not specified.
- Incorrect TTL Settings: A low TTL can increase DNS queries, while a high TTL might delay updates. Find the right balance.
- Not Testing Health Checks: Always test your health checks to ensure they work as expected.
If you run into issues, check the Route 53 dashboard for error messages or consult the AWS documentation for detailed troubleshooting steps.
Conclusion
And there you have it! You’ve learned the ins and outs of AWS Route 53, from registering domains to setting up GeoDNS. I hope this tutorial has been helpful and that you feel confident in managing your DNS with Route 53. Remember, practice makes perfect, so don’t hesitate to experiment and explore more features. Happy routing!
Discover more from CodeSamplez.com
Subscribe to get the latest posts sent to your email.
Leave a Reply