
Are you looking to build powerful PHP web applications but feeling overwhelmed by where to start? Well, I’ve got fantastic news for you! Codeigniter is absolutely the framework you need to master. I’ve been using it for years, and I can tell you firsthand that it’s one of the most beginner-friendly yet powerful PHP frameworks out there.
In this comprehensive tutorial, I’ll walk you through everything you need to know to start building amazing web applications with Codeigniter 4, the latest version as of now. No confusing jargon, just straightforward guidance that’ll have you coding like a pro in no time.
What Makes Codeigniter So Special?
Before we dive into the code, let me tell you why Codeigniter stands out from other PHP frameworks:
- Lightning Fast: Codeigniter is incredibly lightweight and performs much faster than most other frameworks.
- Easy Learning Curve: The documentation is superb, and the framework follows logical patterns that are easy to grasp.
- Zero Configuration: You can set up and start developing with minimal configuration.
- Built-in Security: The framework comes with powerful tools to protect your applications from common web attacks.
- Community Support: A massive community means you’ll never get stuck on a problem for long.
Trust me, once you start using Codeigniter, you’ll wonder how you ever developed without it!
Prerequisites
Before we begin, make sure you have:
- Basic knowledge of PHP (you should understand variables, functions, and object-oriented concepts. Explore our PHP Tutorials to level up your skill!)
- Understanding of the MVC design pattern (I’ll explain this more as we go)
- A local development environment (XAMPP, WAMP, or similar)
- PHP 8.1 or higher installed
- Composer installed (the PHP dependency manager)
Understanding MVC Architecture
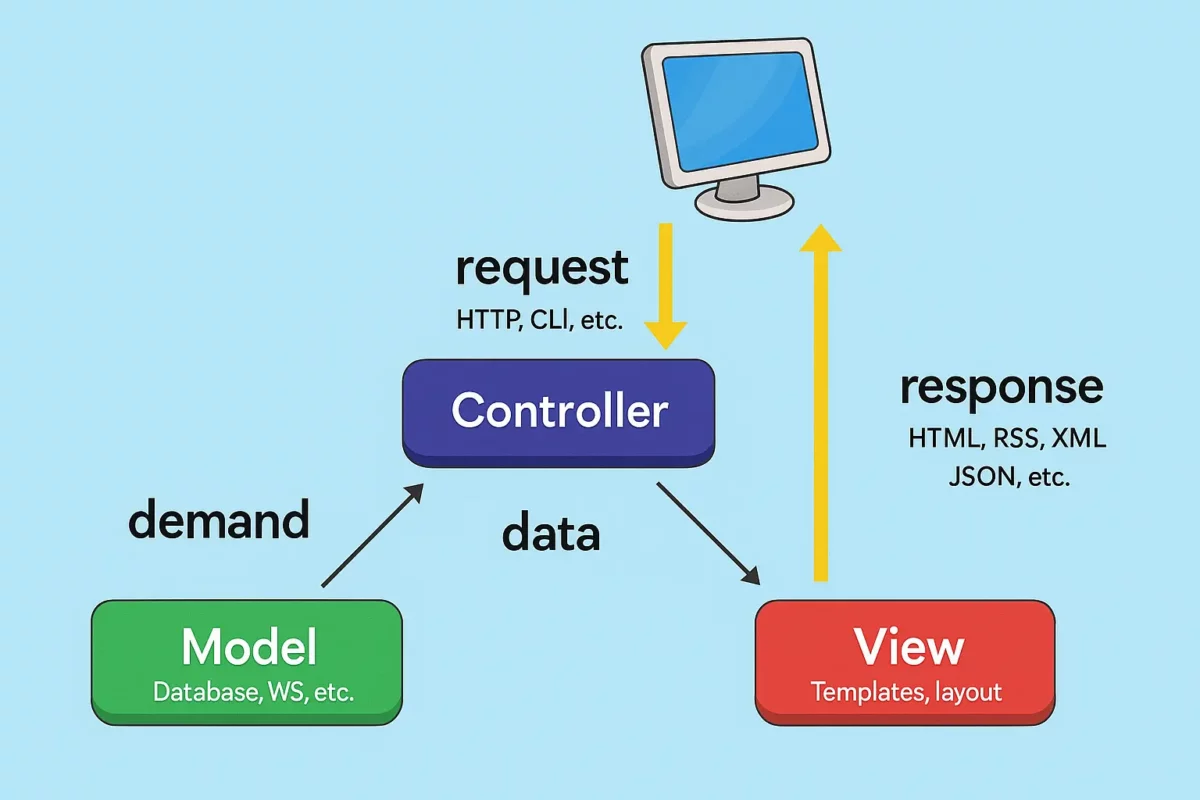
Codeigniter uses the Model-View-Controller (MVC) pattern, which separates your application into three interconnected components:
- Models: Handle your data and business logic
- Views: Display information to users
- Controllers: Process user requests and coordinate between models and views
This separation makes your code more organized, easier to maintain, and simpler to test. You’ll absolutely love how clean your codebase becomes!
Installing Codeigniter 4
Let’s get started by installing Codeigniter 4. There are two ways to do this:
Method 1: Using Composer (Recommended)
Open your terminal or command prompt and run:
composer create-project codeigniter4/appstarter my-projectThis creates a new Codeigniter project named “my-project” in the current directory.
Method 2: Manual Download
- Download the latest version from Codeigniter’s official website
- Extract the files to your web server’s root directory
- Rename the directory to your project name
I strongly recommend using the Composer method as it makes updating Codeigniter much easier in the future.
Directory Structure
After installation, you’ll see the following directory structure:
my-project/
├── app/
│   ├── Config/
│   ├── Controllers/
│   ├── Models/
│   ├── Views/
│   └── ...
├── public/
├── system/
├── writable/
├── tests/
└── vendor/Code language: PHP (php)
Let’s understand what each important directory does:
- app: This is where all YOUR code goes – controllers, models, views, config files, etc.
- public: The only directory that should be publicly accessible. Contains index.php and assets like CSS, JS, and images.
- system: Core framework files – NEVER modify these files directly!
- writable: Contains files that need write access (logs, cache, etc.)
- vendor: Contains third-party dependencies
Basic Configuration
Before we start building, let’s configure a few basics:
1. Environment Setup
Rename the env file to .env in your project root. Open it and set:
CI_ENVIRONMENT = developmentThis enables detailed error reporting during development.
2. Database Configuration
In the .env file, configure your database settings:
database.default.hostname = localhost
database.default.database = my_database
database.default.username = root
database.default.password = your_password
database.default.DBDriver = MySQLiCode language: PHP (php)
3. URL Configuration
Still in the .env file, set your base URL:
app.baseURL = 'http://localhost/my-project/public/'Code language: JavaScript (javascript)Creating Your First Controller
Controllers are the heart of your application, handling user requests and providing responses. Let’s create our first controller:
- Create a file named
Blog.phpin theapp/Controllersdirectory:
<?php

namespace App\Controllers;

class Blog extends BaseController
{
    public function index()
    {
        echo "Hello World! Welcome to my blog.";
    }
}Code language: HTML, XML (xml)
Now, start your local server and navigate to http://localhost/my-project/public/blog. You should see “Hello World! Welcome to my blog.” This simple controller demonstrates how easy it is to create pages in Codeigniter! 🎉
Tip💡: Explore All CodeIgniter Tutorials by CodeSamplez.com
Working with Views
Displaying raw text isn’t very useful. Let’s create a view to render HTML properly:
- Create a directory
app/Views/blog - Create a file
index.phpin this directory:
<!DOCTYPE html>
<html>
<head>
    <title>My Awesome Blog</title>
    <style>
        body {
            font-family: Arial, sans-serif;
            line-height: 1.6;
            max-width: 800px;
            margin: 0 auto;
            padding: 20px;
        }
        h1 {
            color: #333;
            border-bottom: 1px solid #eee;
            padding-bottom: 10px;
        }
        .article {
            margin-bottom: 30px;
            border-bottom: 1px dashed #ccc;
            padding-bottom: 20px;
        }
        .article h2 {
            margin-bottom: 5px;
        }
        .meta {
            color: #777;
            font-size: 0.9em;
            margin-bottom: 15px;
        }
    </style>
</head>
<body>
    <h1>Welcome to My Blog</h1>

    <?php foreach($articles as $article): ?>
        <div class="article">
            <h2><?= $article->title ?></h2>
            <div class="meta">By <?= $article->author ?></div>
            <p><?= $article->content ?></p>
        </div>
    <?php endforeach; ?>
</body>
</html>Code language: HTML, XML (xml)- Now, update your controller to use this view:
<?php

namespace App\Controllers;

class Blog extends BaseController
{
    public function index()
    {
        // Data to be passed to the view
        $data = [
            'articles' => [
                (object)[
                    'title' => 'Getting Started with Codeigniter 4',
                    'author' => 'John Doe',
                    'content' => 'Codeigniter 4 is an amazing framework that makes PHP development a breeze.'
                ],
                (object)[
                    'title' => 'MVC Pattern Explained',
                    'author' => 'Jane Smith',
                    'content' => 'The Model-View-Controller pattern separates concerns and makes your code more maintainable.'
                ]
            ]
        ];

        // Load the view with data
        return view('blog/index', $data);
    }
}Code language: HTML, XML (xml)
When you refresh the page, you’ll see a nicely formatted blog with two articles. That’s the power of views – they separate your HTML from your PHP logic!
Creating a Model
Models handle your data operations. Let’s create a model to manage our blog articles:
- Create a file named
BlogModel.phpin theapp/Modelsdirectory:
<?php

namespace App\Models;

use CodeIgniter\Model;

class BlogModel extends Model
{
    // In a real application, you'd connect to a database
    public function getArticles()
    {
        // For now, we'll return dummy data
        return [
            (object)[
                'title' => 'Getting Started with Codeigniter 4',
                'author' => 'John Doe',
                'content' => 'Codeigniter 4 is an amazing framework that makes PHP development a breeze.'
            ],
            (object)[
                'title' => 'MVC Pattern Explained',
                'author' => 'Jane Smith',
                'content' => 'The Model-View-Controller pattern separates concerns and makes your code more maintainable.'
            ],
            (object)[
                'title' => 'Working with Databases in CI4',
                'author' => 'Mike Johnson',
                'content' => 'Codeigniter makes database operations simple with its powerful database library.'
            ]
        ];
    }
}Code language: HTML, XML (xml)- Update your controller to use this model:
<?php

namespace App\Controllers;

use App\Models\BlogModel;

class Blog extends BaseController
{
    public function index()
    {
        // Create an instance of the model
        $model = new BlogModel();

        // Get data from the model
        $data = [
            'articles' => $model->getArticles()
        ];

        // Load the view with data
        return view('blog/index', $data);
    }
}Code language: HTML, XML (xml)
Working with a Real Database
Now let’s upgrade our model to use a real database:
- Create a database table:
CREATE TABLE articles (
    id INT(11) PRIMARY KEY AUTO_INCREMENT,
    title VARCHAR(255) NOT NULL,
    author VARCHAR(100) NOT NULL,
    content TEXT NOT NULL,
    created_at DATETIME DEFAULT CURRENT_TIMESTAMP
);

INSERT INTO articles (title, author, content) VALUES
('Getting Started with Codeigniter 4', 'John Doe', 'Codeigniter 4 is an amazing framework that makes PHP development a breeze.'),
('MVC Pattern Explained', 'Jane Smith', 'The Model-View-Controller pattern separates concerns and makes your code more maintainable.'),
('Working with Databases in CI4', 'Mike Johnson', 'Codeigniter makes database operations simple with its powerful database library.');Code language: PHP (php)- Update your model to use the database:
<?php

namespace App\Models;

use CodeIgniter\Model;

class BlogModel extends Model
{
    protected $table = 'articles';
    protected $primaryKey = 'id';
    protected $allowedFields = ['title', 'author', 'content'];
    protected $useTimestamps = true;
    protected $createdField = 'created_at';
    protected $updatedField = 'updated_at';

    // No need for a custom getArticles method - we can use the built-in findAll()
}Code language: HTML, XML (xml)- Update your controller:
<?php

namespace App\Controllers;

use App\Models\BlogModel;

class Blog extends BaseController
{
    public function index()
    {
        $model = new BlogModel();

        $data = [
            'articles' => $model->findAll()
        ];

        return view('blog/index', $data);
    }
}Code language: HTML, XML (xml)
That’s it! Codeigniter’s model system makes database operations incredibly simple. You get all the CRUD (Create, Read, Update, Delete) operations without writing a single SQL query!
Creating Forms and Handling Input
Let’s add functionality to create new blog posts:
- Create a new view
app/Views/blog/create.php:
<!DOCTYPE html>
<html>
<head>
    <title>Create New Article</title>
    <style>
        body {
            font-family: Arial, sans-serif;
            line-height: 1.6;
            max-width: 800px;
            margin: 0 auto;
            padding: 20px;
        }
        h1 {
            color: #333;
            border-bottom: 1px solid #eee;
            padding-bottom: 10px;
        }
        .form-group {
            margin-bottom: 15px;
        }
        label {
            display: block;
            margin-bottom: 5px;
        }
        input[type="text"], textarea {
            width: 100%;
            padding: 8px;
            border: 1px solid #ddd;
        }
        textarea {
            height: 150px;
        }
        button {
            background: #4CAF50;
            color: white;
            border: none;
            padding: 10px 15px;
            cursor: pointer;
        }
    </style>
</head>
<body>
    <h1>Create New Article</h1>

    <?php if(session()->getFlashdata('error')): ?>
        <div style="color: red; margin-bottom: 15px;">
            <?= session()->getFlashdata('error') ?>
        </div>
    <?php endif; ?>

    <form action="<?= site_url('blog/store') ?>" method="post">
        <div class="form-group">
            <label for="title">Title</label>
            <input type="text" name="title" id="title" required>
        </div>

        <div class="form-group">
            <label for="author">Author</label>
            <input type="text" name="author" id="author" required>
        </div>

        <div class="form-group">
            <label for="content">Content</label>
            <textarea name="content" id="content" required></textarea>
        </div>

        <button type="submit">Create Article</button>
    </form>

    <p><a href="<?= site_url('blog') ?>">Back to Articles</a></p>
</body>
</html>Code language: HTML, XML (xml)- Add methods to your controller:
// In Blog.php controller

public function create()
{
    return view('blog/create');
}

public function store()
{
    // Validate input
    $rules = [
        'title' => 'required|min_length[3]|max_length[255]',
        'author' => 'required|min_length[3]|max_length[100]',
        'content' => 'required|min_length[10]'
    ];

    if (!$this->validate($rules)) {
        return redirect()->back()->withInput()->with('error', $this->validator->getErrors());
    }

    // Get form data
    $data = [
        'title' => $this->request->getPost('title'),
        'author' => $this->request->getPost('author'),
        'content' => $this->request->getPost('content')
    ];

    // Save to database
    $model = new BlogModel();
    $model->insert($data);

    // Redirect to blog list
    return redirect()->to('/blog')->with('message', 'Article created successfully!');
}Code language: PHP (php)- Add a link to the create page in your index view:
<!-- Add this near the top of app/Views/blog/index.php -->
<p><a href="<?= site_url('blog/create') ?>">Create New Article</a></p>

<!-- And add this to display success message -->
<?php if(session()->getFlashdata('message')): ?>
    <div style="background: #d4edda; color: #155724; padding: 10px; margin-bottom: 20px;">
        <?= session()->getFlashdata('message') ?>
    </div>
<?php endif; ?>Code language: HTML, XML (xml)
Routes
Codeigniter 4 offers powerful routing capabilities. Let’s configure some routes to make our URLs cleaner:
- Open
app/Config/Routes.phpand add:
$routes->get('blog', 'Blog::index');
$routes->get('blog/create', 'Blog::create');
$routes->post('blog/store', 'Blog::store');
$routes->get('blog/(:num)', 'Blog::show/$1');Code language: PHP (php)
This allows URLs like:
http://localhost/my-project/public/blogfor the indexhttp://localhost/my-project/public/blog/createto create an articlehttp://localhost/my-project/public/blog/1to view article #1
Handling AJAX Requests
Want to add some interactivity? Here’s how to handle AJAX requests in Codeigniter:
- Add a new method to your controller:
public function like($id)
{
    // In a real app, you'd update a likes count in the database

    // For now, just return a response
    return $this->response->setJSON(['success' => true, 'likes' => rand(5, 100)]);
}Code language: PHP (php)- Add some JavaScript to your view:
<!-- Add this to your index.php view, before the closing body tag -->
<script>
function likeArticle(id) {
    fetch(`<?= site_url('blog/like') ?>/${id}`)
        .then(response => response.json())
        .then(data => {
            if (data.success) {
                document.getElementById(`likes-${id}`).textContent = data.likes;
            }
        });
}
</script>

<!-- And modify your article display to add a like button -->
<div class="article">
    <h2><?= $article->title ?></h2>
    <div class="meta">
        By <?= $article->author ?> |
        <span id="likes-<?= $article->id ?>">0</span> likes
        <button onclick="likeArticle(<?= $article->id ?>)">Like</button>
    </div>
    <p><?= $article->content ?></p>
</div>Code language: HTML, XML (xml)
Using Helper Functions
Codeigniter comes with many helper functions to simplify common tasks. Let’s use some:
- Load helpers in your controller:
// In Blog.php controller constructor or method
helper(['form', 'url']);Code language: JavaScript (javascript)- Now you can use helper functions in your views:
<!-- Instead of -->
<form action="<?= site_url('blog/store') ?>" method="post">

<!-- You can write -->
<form action="<?= site_url('blog/store') ?>" method="post">
    <?= csrf_field() ?> <em><!-- Adds CSRF protection token --></em>

    <!-- Form inputs here -->
    <?= form_submit('submit', 'Create Article', ['class' => 'button']) ?>
</form>Code language: HTML, XML (xml)
Adding Authentication
Most web applications need authentication. Let’s implement basic login/registration:
- Install the Shield authentication module (Codeigniter’s official auth solution):
composer require codeigniter4/shieldCode language: JavaScript (javascript)- Run the migrations:
php spark shield:setup
php spark migrateCode language: CSS (css)- Create a route group with authentication:
// In app/Config/Routes.php
$routes->group('admin', ['filter' => 'auth'], function($routes) {
    $routes->get('dashboard', 'Admin::dashboard');
    // Other protected routes here
});Code language: PHP (php)
This ensures only authenticated users can access the admin section!
Tips for Debugging
Codeigniter offers excellent tools for debugging your application:
- Enable debug toolbar by setting:
CI_ENVIRONMENT = development- Use the debug bar to inspect:
- Request and response data
- Database queries
- Performance metrics
- Loaded files
- And much more!
- For logging custom messages:
log_message('debug', 'This is a debug message');
log_message('error', 'Something went wrong!');Code language: JavaScript (javascript)
Common Pitfalls to Avoid
As you develop with Codeigniter, watch out for these common mistakes:
- Forgetting namespaces: Always include the correct namespace for your models and controllers.
- Direct model property access: Use getter and setter methods instead of direct property access:
// Incorrect
$article->title = 'New Title';
// Correct
$article->setTitle('New Title');Code language: PHP (php)- Not escaping output: Always use the
esc()function to prevent XSS attacks: php<?= esc($article->title) ?> - Ignoring validation: Always validate user input before processing it.
Best Practices for Codeigniter Development
To get the most out of Codeigniter, follow these best practices:
- Use environment files: Keep sensitive data (like API keys) in
.envfiles. - Create Base Controllers: Extend BaseController for common functionality across controllers.
- Use Services: Leverage Codeigniter’s service system for dependency injection.
- Organize Business Logic: Keep heavy logic in models or services, not controllers.
- Use Migrations: Use database migrations for version control of your database structure.
Conclusion
Congratulations! You’ve now mastered the basics of Codeigniter development. This incredibly powerful framework makes PHP development faster, more secure, and much more enjoyable. From creating simple blogs to complex applications, Codeigniter has absolutely everything you need.
Remember, the best way to learn is by doing. Take what you’ve learned in this tutorial and start building your own projects. The more you practice, the more comfortable you’ll become with the framework.
And don’t forget – the official Codeigniter documentation is your best friend. It’s comprehensive, well-written, and updated regularly.
Happy coding with Codeigniter! If you found this tutorial helpful, please share it with others who might benefit from it.
Discover more from CodeSamplez.com
Subscribe to get the latest posts sent to your email.
First example works but the rest of the examples are lacking file names, etc. so not of much use as a beginner tutorial.
Are you having issues? Can you please explain what? Then I can try to solve it and also update the tutorial for being more helpful for future seekers. Thanks..
Thanks for this…Like it
Nice One. Thanks..
the name of the file should be similar to its class name,
for example if we have a class blog the controller should be blog.php this way you will not get error.
How to create new controller.
Hi, Please refer to “Create A Basic Controller” section. Please let me know f you don’t understand anything..
Thanks Rana. Then i have another doubt how to create admin for cms. I created admin folder in controller. If i typed browser i have error page not found. What i do Rana.
Hi, well, you will have to study a little about how codeigniter urls work and also how you can customize the routing. Seems like, you are facing issue similar to this one: http://stackoverflow.com/questions/8143997/codeigniter-2-0-x-controller-subdirectories-default-controller-needs-to-be-in . There is a solution already, refer to that. Hope these helps. Thanks.
that’s good
The first section does work, then the rest of the article becomes unclear.
1. In the section “Create a model”, what should be the filename of that file?
2. In the section “Create A View”, what should be the filename of that?
Hi MichaelB, There is no specific restriction to the naming convention for model/view(or even controller). You can use any name, just you will have to remember to extend them from their corresponding base class. Like, if you are creating a model, you must have to inherit the “CI_Model” class, to get the characteristics of a regular Codeigniter model. In case of view, just name the template any name and then call it from controller with data(if any), Like as follows:
$this->load->view(“template_name”,$data);
I will edit the tutorial for calling a view from controller. Seems it will may helpful to some other guys like you. Thanks for pointing out is.
Really great programming abilities you\’ve there. i\’m a programmer myself but I still require to learn until I reach your ability. great article!
Wow, nice post buddy. It can help me to develop website using codeigniter framework.
thank you very much
it give me complete inside out to the MVC as well as codeignighter
thanks you very very much
this helped me a lot buddy and moreover your site interface is really good and CLEAN.
keep up the good work.
hi rana, i have problem with include php file. i use include(), require() and require_once(). but none of them works.
i have a php file that contain only variables, so much variables. and i want to include the file to passing variables.
how i supposed to do. pls help me.
the ci directory:
-application
-system
-user_guide
-style
-include_folder
and my file in include_folder directory.
thanks in advance.
try using:
APPPATH.”/include_folder/file_name.php”
it vary good for fresher + inretmideate
hello Rana,
I’m a beginer in CI my problem is how to load jquery library in the current version of CI and how to apply a common CSS styling sheet to all my views
Thanx Rana for providing these Tuts these are very useful for everyone especially fresher
great,i have one problem i want to pass the more then one query from the model and get in controller.now i want to some additional work on that query and pass to the view.how can i do that.thanks
Very useful especially on passing data to the view and how the keys of the associative array are automatically turned into variables in the view.
what would be the best IDE for code igniter?
where I can use breakpoints,
the first program for blog.. throws an error more of a warnin. creating default object on empty value..
Hello Raza, it seems like you php compatibility error. This exercize was written with php 5.3.x and you are probably using php 5.4 , right? Just initialize all the variables at first (example: $test = (object)NULL) solves the problem in most cases. If you are still not sure what to do, can you give the error line number or a screenshot link? Thanks.
How to configure with lamp? Anyone please help me..
i have this problem. I have created a views/templates/navbar.php using bootstrap. the bootstrap is located in the root directory assets/bootstrap. I called the navbar.php through the default controller (news). It works.
Then I create another views/templates/page.php. I created a function create_cosec in the default controller with $this->load->view(‘navbar’); and $this->load-view(‘page.php’); . I wish the page will display the navbar on the top follow by the page details.
When I call the page localhost/index.php/news/ create_cosec ==>the page is display correctly but the navbar displayed but without the bootstrap functionalities. It seems that codeigniter doesn’t know where is the assets/bootstrap directory?
Is it URL issues?
Thanks
Good framework to work with, also believe in learning the pure php language too, and also try to learn other frameworks so that you keep yourself on top of development.
Good explanation..but lacks screenshots.
How about some explanation of the root folders like “Source files”… what other folders are at this level? I’m looking at it from a continuous deployment point of view.
its giving error
A PHP Error was encountered
Severity: Warning
Message: Creating default object from empty value
Filename: models/blogmodel.php
Line Number: 12
in the list model
That is because of php version, I assume. Should be fixed by using ‘$list = (object)NULL;’ . Hope this helps.
Excellent Tutorial !! Helps alot.
Good and understandable tutorial
Thanks for tutorial 🙂
so nice
Hi Md Ali Ahsan Rana,
I’m getting an error “fetching ajax content” when i run my application in my local server xammp and also getting error each time when i refresh the pages of my project.
waiting for your response
thanks!
There isn’t any ajax related code been shared on this tutorial. So, I am assuming, you are trying in a little different way. Thus I will suggest you to share your code/more info in some kind of code sharing site and put the link here. This will help to understand your issue more better.
nice tutorials.. thanks Mr.Rana
have entered $list = (object)NULL; but returns an errror:
Fatal error: Cannot use object of type stdClass as array in C:\xampp\blog\codeigniter\application\models\blogModel.php on line 13
Where should i place the line of code? Thanks! Greate tutorial for beginners
I guess, that’s because of your PHP version. You can try with ‘Array()’/’array()’ instead of ‘(object)NULL’, if you are using older versions of PHP. Hope that helps.
Please tell me how we load multiple pages in ci
Hi,
I am Saranya.
I worked lot on CMS, i want to learn Framework that too particularly code igniter, Please guide me how to learn from where to learn etc…
hi,
i have a query. i just installed codeigniter using composer ( $ composer require “rogeriopradoj/codeigniter 2.2.1-rc.2” ) There i got folder structure on root
-application
-vendor
and system file was in vendor folder. I m quite confused whats the se of this vendor folder. And how to start project . Please help me out
Hai Rana.. There is in need to change the code from $list[0] = (object)NULL; to $list[1] = (object)NULL; in its second occurrence in “Create a model topic”. Array index value need to change from “0” to “1” to get escape from error in displaying output. Thanks for your simple and clear explanation about CodeIgniter.
Correct code:
$list[0] = (object)NULL;
$list[0]->title = “first blog title”;
$list[0]->author = “author 1”;
$list[1] = (object)NULL;
$list[1]->title = “second blog title”;
$list[1]->author = “author 2”;
Thanks sir for this blog
Hi Mr.Rana
I hope this blog so good for beginner CI like me.
Thank you.
thank you,Highly appreciate if you use file name and paths in your tutorial,then it would be a absolute beginners guide.
thank you for this… I will bookmark for the future